13: Drawing the Pallets
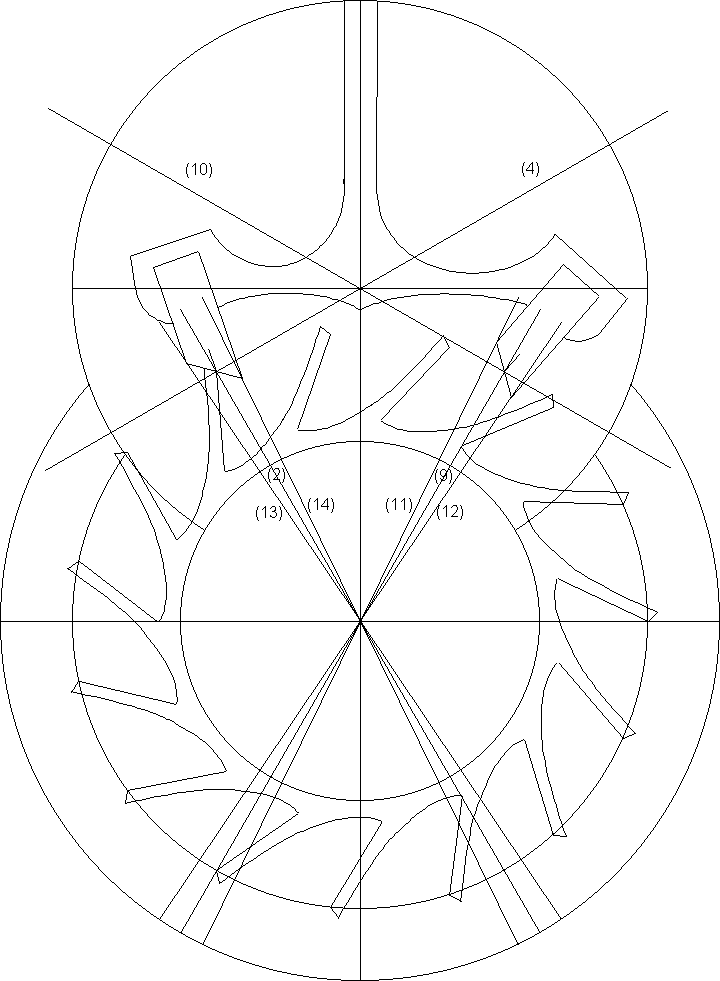
The first tooth was drawn next to line (2), which had an angle of 30° relative to the vertical line (1). The 30° angle was chosen so that there would be a 2.5 tooth span between the pallets for a 15 tooth wheel. The angle between lines (2) and (4) was 90° so that the angle between the force exerted by the escape tooth and the force that acted to rotate the pallet would be 90°.
 |
Rotate line (1) clockwise by 30° to get line (9). Rotate line (9) by 90° to get line
(10). Place line (10) onto the point where line (9) intersects the edge of the six inch
circle. The point where lines (1), (4) and (10) intersect will be the pallet's circle center.
 |
If you rotate line (2) counterclockwise by 2°, you would see that the escape
wheel's impulse face occupies a span of 2° of escape wheel rotation. (The impulse face
also provides 3° of lift and lock.)
 |
Since the escape wheel rotates by 12° per beat and you want 2° for drop and 2° for
the escape tooth's impulse face, the pallet should occupy a span of 8°. Rotate line (9)
counterclockwise by 4° to get line (11). Rotate line (9) clockwise by 4° to get line (12).
Repeat with line (2) to get lines (13) and (14):
 |
Rotate line (2) counterclockwise by 45° to get line (15). Notice that it is at an angle
half way between the escape circle's radius and the pallet circle's radius, shown by lines
(2) and (4) respectively:
 |
Rotate line (13) clockwise by 15° to get line (16), and place it onto the point
where lines (13) and (15) intersect. Line (16) will be the pallet's locking face, and it
will have a draw angle of 15°. Duplicate line (16) and place it onto the point where
lines (14) and (15) intersect: lines (16) and (17) are parallel. Rotate line (17) by 90° to
get line (18) and place it in a suitable position along lines (16) and (17). The pallet is
now recognizable. You could place a small line at the point where lines (2) and (15)
intersect: this small line would show the mid-point of the pallet.
 |
 |
Once you finish the entry pallet, group the lines and duplicate them. Rotate the
second pallet clockwise by 60° because that is the angle between lines (2) and (9), and
then place the pallet on the exit side such that the mid-point of the impulse face lies on
the point where lines (9) and (10) intersect. Most watches have different pallets, but an
escapement using the same pallet on both sides can be designed, and using the same
pallets makes manufacture easier.
It will be necessary to draw the pallet circle to perform a simulation. The circle must
be larger than the drawing of the pallets, so I chose a six inch diameter circle, placed a
horizontal and a vertical line in it, grouped the circle and the lines, and then placed them
such that the circle center would lie on the point where lines (1), (4) and (10) intersect.
 |
To draw the pallet arms, you could use circles, stretched and shaped to give the
outline you desire. It should be obvious by looking at the drawing below that the
design is of equidistant impulse.
 |
 |
Go to Chapter 14
Go toTable of Contents
Go to Escapements